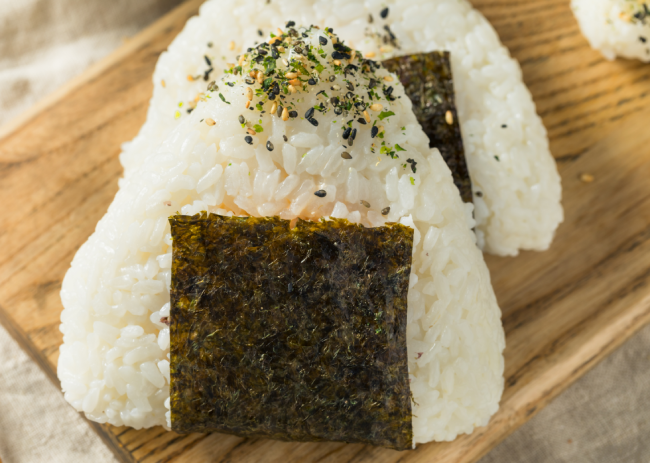
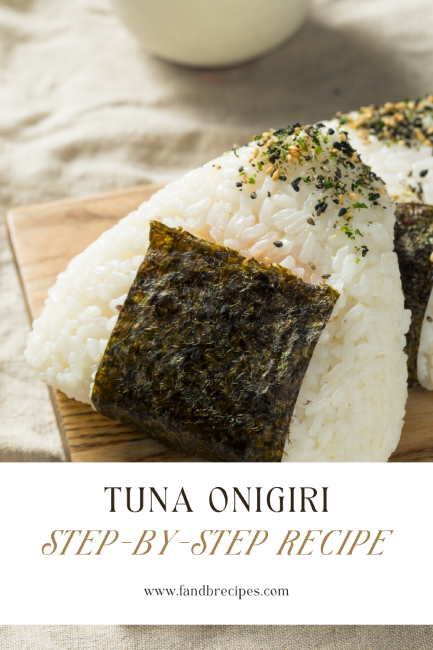
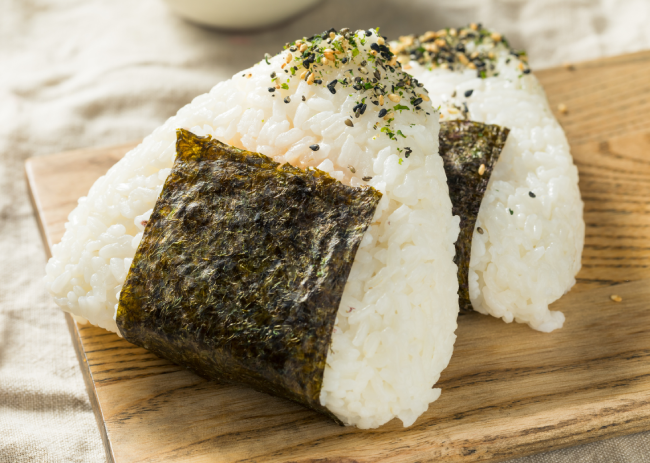
Tuna Onigiri: Step-By-Step Recipe
Step into the captivating realm of Japanese gastronomy as we unravel the secrets to crafting a delectable masterpiece – the tantalizing Tuna Onigiri.
Within the confines of this revered recipe, a harmonious union between the humble rice grain and the exquisite essence of seasoned tuna awaits, promising to transport your taste buds to the vibrant streets of Japan.
Transitioning from the ordinary to the extraordinary, onigiri embodies the essence of simplicity and versatility. These delightful rice balls are not only a loving staple in Japanese cuisine. But also a portable and convenient snack, perfect for on-the-go indulgence or a satisfying addition to any meal.
So, allow us to be your guide on this culinary journey. As we delve into the intricate art of crafting the perfect Tuna Onigiri. Together, we will explore a symphony of flavours, textures, and techniques, culminating in a delightful creation that will leave you yearning for more.
What Is Tuna Onigiri?
Tuna Onigiri is a savoury Japanese dish consisting of seasoned tuna and rice. This handheld treat combines the flavours of tender tuna with the simplicity of rice, resulting in a delightful and convenient snack.
Onigiri, a beloved staple in Japanese cuisine, offers a versatile and portable option for enjoying a flavourful combination of ingredients. Whether enjoyed on the go or as part of a meal, Tuna Onigiri is a culinary delight that showcases the essence of Japanese gastronomy.
Why This Recipe Works
The recipe for Tuna Onigiri works for several reasons:
- Simplicity: The recipe is relatively simple and requires only a few ingredients. It typically consists of cooked sushi rice, canned tuna, mayonnaise, and salt. This simplicity makes it accessible and easy to prepare.
- Flavour combination: The combination of tuna, mayonnaise, and salt creates a flavourful filling for the onigiri. The creamy texture of the mayonnaise enhances the taste of the tuna, while the salt helps to balance the flavours.
- Versatility: Tuna Onigiri can enjoy on its own as a snack or as part of a larger meal. It is a versatile dish that can pack for picnics and lunchboxes or enjoyed as a quick and satisfying meal at home.
- Texture: Onigiri has a unique texture due to the sushi rice used. The rice is sticky and slightly compacted, which allows it to hold its shape when formed into triangles or balls. The combination of the soft rice and the tuna filling provides a pleasant contrast in textures.
- Portability: Onigiri traditionally wraps in a sheet of nori (dried seaweed), which not only adds flavour but also acts as a natural wrapper, making the onigiri portable and easy to eat without utensils. This makes it a convenient option for meals on the go.
- Traditional appeal: Onigiri is a popular and traditional Japanese snack. Its popularity attributes to its simplicity, convenience, and delicious taste. The recipe enjoyed for generations and has stood the test of time.
Overall, the recipe for Tuna Onigiri works because it combines simple ingredients, flavourful fillings, appealing textures, and portability, making it a satisfying and enjoyable snack or meal option.
Ingredients Required to Make Tuna Onigiri
Each ingredient contributes to the overall flavour and texture of this delightful dish.
- 1 ½ cups Japanese Short-Grain Rice (Sushi Rice): We begin with 1½ cups of Japanese short-grain rice, commonly known as sushi rice. This variety of rice, equivalent to about 2 rice cooker cups, possesses a unique stickiness. It allows it to hold its shape when formed into onigiri.
- 440 ml Cold Water: To cook the rice to perfection, we need 15 fluid ounces (440 mL) of cold water. The water adds to the rice and allows it to absorb moisture, resulting in fluffy and evenly cooked grains.
- Kosher Salt: A pinch of kosher salt is used to season the rice, enhancing its natural flavours and adding a subtle savoury note. This simple ingredient helps to elevate the taste of the onigiri.
- 4.5 ounces Solid albacore tuna from Portofino with extra virgin olive oil: Our star ingredient is a 4.5-ounce can of Solid albacore tuna from Portofino with extra virgin olive oil, drained of excess oil. This high-quality tuna offers a delicate yet robust flavour and a tender texture that complements the rice perfectly. Its infusion adds a touch of richness to the overall taste.
- 1 ½ tbsp Mayonnaise: To enhance the creaminess and richness of the tuna filling, we add 1½ tablespoons of mayonnaise. The creamy texture of the mayonnaise help to bind the ingredients together, creating a cohesive and flavourful filling.
- 1 tsp Sriracha Hot Sauce: For a hint of spicy heat, 1 teaspoon of Sriracha hot sauce incorporate into the tuna filling. This adds a delightful kick of flavour without overwhelming the other ingredients.
- ½ tsp Rice Vinegar: To provide a gentle acidity and balance the flavours, we use ½ teaspoon of rice vinegar. This mild vinegar enhances the taste of the rice and complements the seasoned tuna.
- Scallion (Green Parts Only): One scallion, finely sliced using only the green parts, adds a refreshing and aromatic element to the onigiri. The vibrant green colour and mild onion-like flavour elevate the overall presentation and taste.
- Toasted Black Sesame Seeds (Optional): For added texture and visual appeal, toasted black sesame seeds can be sprinkled over the onigiri. These small but flavourful seeds offer a delicate nuttiness and contrasting crunch.
- 3 Toasted Nori Sheets: To wrap the onigiri, we need 3 sheets of toasted nori. It should be cut crosswise in half. The nori provides a slightly salty and umami taste while adding a pleasant chewiness to the outer layer of the onigiri.
Tools Required to Make Tuna Onigiri
Here are certain tools required to make Onigiri:
- Rice Cooker: A rice cooker is essential for cooking Japanese short-grain rice to perfection. It ensures even cooking and takes the guesswork out of achieving the right texture.
- Fine-Meshed Sieve: This tool is useful to rinse the rice under cold water, removing excess starch and impurities. It helps to achieve a thorough rinse and ensures clean, high-quality rice.
- Mixing Bowl: A medium-sized mixing bowl helps to combine the drained Portofino Solid Albacore Tuna, mayonnaise, sriracha hot sauce, rice vinegar, and finely sliced scallions. It provides a convenient vessel for mixing and evenly distributing the ingredients.
- Fork: A fork is used to combine the tuna, mayonnaise, hot sauce, and rice vinegar in the mixing bowl. It helps to break up and mix the ingredients together, ensuring a cohesive and flavourful filling.
- Wooden Spoon or rice paddle: A wooden spoon or rice paddle helps to gently fluff the cooked rice and prevent it from becoming overly compacted. It helps to maintain the light and fluffy texture of the rice.
- Medium Saucepan (non-stick, if possible): If you don’t have a rice cooker, a medium-sized saucepan is needed to cook the rice on the stovetop. Opt for a non-stick saucepan, if available, to prevent the rice from sticking to the bottom.
- Kitchen Towel: After cooking the rice, a kitchen towel is placed over the vessel to absorb excess moisture and allow the rice to steam. This step helps to achieve a perfectly cooked and fluffy texture.
- Small and Medium Bowls: Small and medium bowls help to hold room-temperature water and kosher salt, respectively. It helps in moistening the hands and to pinch the rice. These bowls provide a convenient and organized setup for the assembly process.
- Nori Sheets: Nori sheets, which are dried seaweed, are essential for wrapping the onigiri. They provide a savoury and slightly salty taste while also acting as a convenient handheld wrapper.
Tuna Onigiri Recipe
Tuna Onigiri makes for an easy and satisfying breakfast, snack or quick meal when you’re in a rush.
Servings: 4 – 6 Prep Time: 20 Minutes Cook Time: 30 Minutes Total Time: 50 Minutes Calories: 250kcal Cuisine: Main Course
To prepare the rice, strain it through a fine-mesh sieve with lots of cold water. Till the water flows clean, rub the rice grains between your fingers. By doing this, extra starch is eliminated, and the texture of the cooked rice is improved. Clearly drain the rice.
Then, combine the rice and water and cook them in a rice cooker as directed by the manufacturer. The best-textured sushi rice is guaranteed with this procedure. In the absence of a rice cooker, mix the rice and water in a medium saucepan—preferably one that is nonstick. In the end, bring the mixture to a boil before turning down the heat.
Cook the dish with the lid on for 16 to 18 minutes, or until all the water has been absorbed. Then, turn off the heat and use a rice paddle or a wooden spoon to gently fluff the rice.
After covering the pot with a fresh kitchen towel and a lid, leave it alone for ten minutes. Make the onigiri filling as the rice begins to slightly cool.
Creating the filling: After that, stir the albacore tuna, mayonnaise, spicy sauce, and rice vinegar together with a fork in a medium bowl until well blended. Add the scallions and stir.
Set up a medium bowl of room-temperature water and a small bowl of kosher salt for pinching while you assemble the onigiri. Start putting together the onigiri by hand as soon as the sushi rice is cold enough to handle.
Put your hands in the water basin to moisten them. This stops the rice from clinging to your hands while you’re moulding it. Rub your palms together after lightly sprinkling them with kosher salt.
Then, using one palm, gently massage about half a cup of sushi rice into a thick, oblong form. Put a tablespoon of the tuna filling in the centre of the rice and press it together with your fingertips. Using a pinch or two more rice, if necessary, cover the filling with the rice.
Use the palms of one hand and the fingers of the other to gently mould the rice ball into a broad triangular shape. As you move, rotate the rice ball. However, try to avoid packing the rice too tightly; it should hold together well.
Sprinkle black sesame seeds all over the onigiri’s outside. After that, wrap each onigiri in a sheet of nori and top each with a further tiny spoonful of tuna filling.
Finally, serve right away and take joy!
Tuna Onigiri: Nutritional Information
Calories: 250 kcal
Carbohydrates: 41 g
Protein: 10 g
Fat: 4 g
Saturated fat: 0.5 g
Sodium: 150 mg
Fiber: 2 g
Sugar: 1 g
Tips To Make The Best Tuna Onigiri
- Cook the rice properly: Rinse the Japanese short-grain rice thoroughly to remove extra starch. Next, cook it with the appropriate amount of cold water on a stovetop or in a rice cooker. Remember to add a pinch of kosher salt for enhanced flavour.
- Prepare the tuna filling: Combine the drained Solid albacore tuna from Portofino with extra virgin olive oil with mayonnaise, sriracha hot sauce, rice vinegar, and finely sliced scallions. After that, Mix the ingredients well to ensure they are evenly distributed and create a cohesive filling.
- Taste and adjust: Before assembling the onigiri, taste the tuna filling and make any necessary adjustments. Add more mayonnaise for creaminess, sriracha hot sauce for spiciness, or rice vinegar for acidity, based on your personal preference.
- Shape the onigiri: Wet your hands with water to prevent sticking, then take a small handful of cooked rice and flatten it in your palm. Place a spoonful of tuna filling in the center, then fold the rice around the filling, shaping it into a triangle or oval. Repeat the process until all the rice and filling are used.
- Add optional toppings: If desired, sprinkle toasted black sesame seeds over the onigiri for added texture and flavour. Moreover, This optional step provides a delightful nuttiness and visual appeal to the final dish.
- Wrap with nori: Take a half-sheet of toasted nori and wrap it around the shaped onigiri. The nori adds a slightly salty and umami taste, while also providing a convenient hand-held wrapper.
- Enjoy and store properly: Tuna Onigiri should enjoy fresh, but if you have leftovers, store them in an airtight container in the refrigerator. Consume within a day or two for optimal taste and texture.
Lastly, by following these tips and incorporating the suggested transition words, you’ll be well on your way to creating delectable Tuna Onigiri that is bursting with flavour.
Storage and Freezing
To store and freeze Tuna Onigiri, follow these steps:
Storing: Place the Tuna Onigiri in an airtight container or wrap each onigiri individually in plastic wrap. This will help prevent moisture loss and maintain the freshness of the onigiri. Store them in the refrigerator.
Freezing: If you want to freeze the Tuna Onigiri for longer storage, make sure they are completely cooled before proceeding. Individually wrap each onigiri tightly in plastic wrap, ensuring there are no exposed areas. Place the wrapped onigiri in a freezer-safe bag or container, removing as much air as possible to prevent freezer burn.
Label and Date: Remember to label the containers or bags with the contents and date of preparation. This will help you keep track of their freshness and ensure you consume them within a reasonable timeframe.
Storage Duration: When stored in the refrigerator, Tuna Onigiri can typically stay fresh for up to 2 to 3 days. In the freezer, they can store for up to 1 month.
Thawing and Reheating: When you’re ready to eat, thaw the frozen onigiri in the refrigerator for 10-12 hours. Once thawed, enjoy them cold or reheat them briefly in a microwave or oven to restore their warmth. If using a microwave, wrap the onigiri in a damp paper towel to prevent them from drying out.
Remember to exercise caution when reheating onigiri, as overheating can cause the rice to become hard and dry. Enjoy the stored or frozen Tuna Onigiri within a reasonable time frame for the best taste and texture.
By actively following these steps, you can ensure that your Tuna Onigiri remains fresh, delicious, and ready to enjoy. Eat it whenever you’re in the mood for a tasty and convenient snack or meal.
FAQs
Is Onigiri Tuna Healthy?
Onigiri tuna can be a healthy choice due to several factors.
Firstly, tuna is a lean source of protein, making it an excellent option for those looking to incorporate protein into their diet. It provides essential amino acids that support muscle growth, repair, and overall body functioning.
Additionally, tuna is rich in omega-3 fatty acids, which are beneficial for heart health. These fatty acids help reduce inflammation, lower blood pressure, and improve overall cardiovascular health.
Furthermore, onigiri tuna typically includes other nutritious ingredients such as rice and scallions. Japanese short-grain rice used in onigiri is a good source of carbohydrates, providing energy and essential nutrients. Scallions add a boost of flavour and are packed with vitamins, minerals, and antioxidants.
What Are The Top 3 Most Popular Onigiri?
The top three most popular onigiri varieties are:
- Salmon Onigiri: Salmon onigiri is a good choice among onigiri enthusiasts. The succulent and flavourful salmon filling, often seasoned with soy sauce or mirin, provides a delightful taste experience. The combination of tender cooked salmon and seasoned rice creates a harmonious balance of textures and flavours.
- Tuna Mayo Onigiri: Tuna mayo onigiri is another highly popular option. The creamy and savoury tuna filling, mixed with mayonnaise, creates a rich and satisfying taste. This combination offers a pleasant contrast to the fluffy rice, making it a favourite among those who enjoy a creamy and indulgent onigiri.
- Plum (Ume) Onigiri: Plum onigiri, also known as ume onigiri, holds a special place in the hearts of onigiri lovers. The unique tangy and slightly sour flavour of pickled plum, known as umeboshi, infuses the rice with its distinct taste. The saltiness of the plum complements the rice perfectly, resulting in a refreshing and distinctive onigiri choice.
These three onigiri varieties are widespread due to their delicious flavours, appealing textures, and the way they showcase the versatility of onigiri as a convenient and satisfying snack or meal option.
Why Is It Called Devil Onigiri?
The Devil Onigiri gets its name due to its fiery and spicy flavour profile, which packs a punch and adds a devilish twist to the traditional onigiri.
The name “Devil Onigiri” is attributed to the inclusion of spicy ingredients such as hot peppers or hot sauce in the filling. The fiery heat adds a devil-like spiciness that sets this particular onigiri apart from milder variations.
The Devil Onigiri earns its name by incorporating bold and spicy elements that ignite the taste buds. With the inclusion of hot peppers or hot sauce, this onigiri variant infuses a devilish level of spiciness into the filling. The resulting flavour profile is not for the faint-hearted and brings a fiery kick to the traditional onigiri experience.
What Are Onigiri Made Of?
Onigiri, a popular Japanese dish, has a combination of key ingredients that come together to create a delicious and satisfying treat. At the heart of onigiri is Japanese short-grain rice, also known as sushi rice. This particular variety of rice is sticky when cooked, allowing it to hold its shape when formed into onigiri.
Along with the rice, onigiri features a wide array of fillings that can cater to various tastes and preferences. Grilled or seasoned meats such as salmon, tuna, or chicken are common choices, as well as pickled vegetables like umeboshi (pickled plum) or savoury options like seasoned seaweed or kombu. These fillings add a burst of flavour and texture to the onigiri.
To enhance the taste, seasonings such as soy sauce, salt, or furikake, a Japanese seasoning blend, are often added. Lastly, nori, a type of dried seaweed, is frequently used to wrap the onigiri. It adds a touch of saltiness and provides a convenient way to hold and eat the onigiri.
The combination of sticky rice, flavourful fillings, and complementary seasonings makes onigiri a versatile and enjoyable dish that can enjoy as a quick snack or a satisfying meal.
Is Onigiri Eaten Hot Or Cold?
You can serve onigiri either hot or cold, offering flexibility in serving options. Some individuals prefer to enjoy their onigiri warm, immediately after cooking or heating it. This can achieve by grilling or pan-frying the onigiri to create a crisp exterior while maintaining the softness of the rice within.
Others, however, prefer to enjoy onigiri at room temperature or even chilled. This is particularly common when onigiri is being packed as a portable snack or included in bento boxes for a convenient and satisfying meal on the go.
Ultimately, the choice between hot or cold onigiri is a matter of personal preference and the desired eating experience.
Is Onigiri A Snack Or Meal?
Onigiri serves a dual purpose, acting as both a snack and a meal depending on the context and serving size. When enjoyed as a snack, onigiri provides a convenient and portable option for quick bites on the go. Its compact size and handheld form makes it ideal for satisfying hunger pangs between meals or as a light refreshment.
On the other hand, when served in larger portions or paired with additional side dishes, onigiri can transform into a substantial and fulfilling meal. The combination of rice, flavourful fillings, and seasonings offers a balanced and satisfying culinary experience that can satiate hunger and provide sustained energy. The versatility of onigiri as both a snack and a meal makes it a popular choice for various occasions and eating preferences.
In Conclusion
The recipe for Tuna Onigiri presents a delightful and flavourful option for sushi lovers and Japanese cuisine enthusiasts alike.
By actively combining the key ingredients of Japanese short-grain rice, Portofino Solid Albacore Tuna, mayonnaise, sriracha hot sauce, rice vinegar, scallions, and toasted nori, we create a harmonious blend of textures and flavours. The transition words emphasize the successful outcome of the recipe.
With its tender and slightly chewy rice, complemented by the savoury tuna filling infused with creamy mayonnaise and a hint of spicy heat from the sriracha hot sauce, each bite of Tuna Onigiri tantalizes the taste buds. The addition of rice vinegar adds a gentle acidity that balances the flavours, while the finely sliced scallions contribute a refreshing touch.
The option to sprinkle toasted black sesame seeds for added texture and wrapping the onigiri in toasted nori sheets further elevates the overall presentation and taste. Whether enjoyed as a snack or a satisfying meal, the Tuna Onigiri promises a delightful culinary experience that celebrates the essence of Japanese cuisine.
Tuna Onigiri: Step-By-Step Recipe
Ingredients
- 1½ cup Japanese Short-Grain Rice Sushi Rice
- 440 ml Cold Water
- Kosher Salt to taste
- 4.5 ounces Solid albacore tuna from Portofino with extra virgin olive oil
- 1½ tbsp Mayonnaise
- 1 tsp Sriracha Hot Sauce
- ½ tsp Rice Vinegar
- Scallion Green parts only
- Toasted Black Sesame Seeds Optional
- 3 Nori Sheets Toasted
Instructions
- To prepare the rice, strain it through a fine-mesh sieve with lots of cold water. Till the water flows clean, rub the rice grains between your fingers. By doing this, extra starch is eliminated, and the texture of the cooked rice is improved. Clearly drain the rice.
- Then, combine the rice and water and cook them in a rice cooker as directed by the manufacturer. The best-textured sushi rice is guaranteed with this procedure. In the absence of a rice cooker, mix the rice and water in a medium saucepan—preferably one that is nonstick. In the end, bring the mixture to a boil before turning down the heat.
- Cook the dish with the lid on for 16 to 18 minutes, or until all the water has been absorbed. Then, turn off the heat and use a rice paddle or a wooden spoon to gently fluff the rice.
- After covering the pot with a fresh kitchen towel and a lid, leave it alone for ten minutes. Make the onigiri filling as the rice begins to slightly cool.
- Creating the filling: After that, stir the albacore tuna, mayonnaise, spicy sauce, and rice vinegar together with a fork in a medium bowl until well blended. Add the scallions and stir.
- Set up a medium bowl of room-temperature water and a small bowl of kosher salt for pinching while you assemble the onigiri. Start putting together the onigiri by hand as soon as the sushi rice is cold enough to handle.
- Put your hands in the water basin to moisten them. This stops the rice from clinging to your hands while you're moulding it. Rub your palms together after lightly sprinkling them with kosher salt.
- Then, using one palm, gently massage about half a cup of sushi rice into a thick, oblong form. Put a tablespoon of the tuna filling in the centre of the rice and press it together with your fingertips. Using a pinch or two more rice, if necessary, cover the filling with the rice.
- Use the palms of one hand and the fingers of the other to gently mould the rice ball into a broad triangular shape. As you move, rotate the rice ball. However, try to avoid packing the rice too tightly; it should hold together well.
- Sprinkle black sesame seeds all over the onigiri's outside. After that, wrap each onigiri in a sheet of nori and top each with a further tiny spoonful of tuna filling.
- Finally, serve right away and take joy!
Notes
- Cook the rice properly: Rinse the Japanese short-grain rice thoroughly to remove extra starch. Next, cook it with the appropriate amount of cold water on a stovetop or in a rice cooker. Remember to add a pinch of kosher salt for enhanced flavour.
- Prepare the tuna filling: Combine the drained Solid albacore tuna from Portofino with extra virgin olive oil with mayonnaise, sriracha hot sauce, rice vinegar, and finely sliced scallions. After that, Mix the ingredients well to ensure they are evenly distributed and create a cohesive filling.
- Taste and adjust: Before assembling the onigiri, taste the tuna filling and make any necessary adjustments. Add more mayonnaise for creaminess, sriracha hot sauce for spiciness, or rice vinegar for acidity, based on your personal preference.
- Shape the onigiri: Wet your hands with water to prevent sticking, then take a small handful of cooked rice and flatten it in your palm. Place a spoonful of tuna filling in the center, then fold the rice around the filling, shaping it into a triangle or oval. Repeat the process until all the rice and filling are used.
- Add optional toppings: If desired, sprinkle toasted black sesame seeds over the onigiri for added texture and flavour. Moreover, This optional step provides a delightful nuttiness and visual appeal to the final dish.
- Wrap with nori: Take a half-sheet of toasted nori and wrap it around the shaped onigiri. The nori adds a slightly salty and umami taste, while also providing a convenient hand-held wrapper.
- Enjoy and store properly: Tuna Onigiri should enjoy fresh, but if you have leftovers, store them in an airtight container in the refrigerator. Consume within a day or two for optimal taste and texture.