Tuna Onigiri: Step-By-Step Recipe
Tuna Onigiri makes for an easy and satisfying breakfast, snack or quick meal when you're in a rush.
Ingredients
- 1½ cup Japanese Short-Grain Rice Sushi Rice
- 440 ml Cold Water
- Kosher Salt to taste
- 4.5 ounces Solid albacore tuna from Portofino with extra virgin olive oil
- 1½ tbsp Mayonnaise
- 1 tsp Sriracha Hot Sauce
- ½ tsp Rice Vinegar
- Scallion Green parts only
- Toasted Black Sesame Seeds Optional
- 3 Nori Sheets Toasted
Instructions
- To prepare the rice, strain it through a fine-mesh sieve with lots of cold water. Till the water flows clean, rub the rice grains between your fingers. By doing this, extra starch is eliminated, and the texture of the cooked rice is improved. Clearly drain the rice.
- Then, combine the rice and water and cook them in a rice cooker as directed by the manufacturer. The best-textured sushi rice is guaranteed with this procedure. In the absence of a rice cooker, mix the rice and water in a medium saucepan—preferably one that is nonstick. In the end, bring the mixture to a boil before turning down the heat.
- Cook the dish with the lid on for 16 to 18 minutes, or until all the water has been absorbed. Then, turn off the heat and use a rice paddle or a wooden spoon to gently fluff the rice.
- After covering the pot with a fresh kitchen towel and a lid, leave it alone for ten minutes. Make the onigiri filling as the rice begins to slightly cool.
- Creating the filling: After that, stir the albacore tuna, mayonnaise, spicy sauce, and rice vinegar together with a fork in a medium bowl until well blended. Add the scallions and stir.
- Set up a medium bowl of room-temperature water and a small bowl of kosher salt for pinching while you assemble the onigiri. Start putting together the onigiri by hand as soon as the sushi rice is cold enough to handle.
- Put your hands in the water basin to moisten them. This stops the rice from clinging to your hands while you're moulding it. Rub your palms together after lightly sprinkling them with kosher salt.
- Then, using one palm, gently massage about half a cup of sushi rice into a thick, oblong form. Put a tablespoon of the tuna filling in the centre of the rice and press it together with your fingertips. Using a pinch or two more rice, if necessary, cover the filling with the rice.
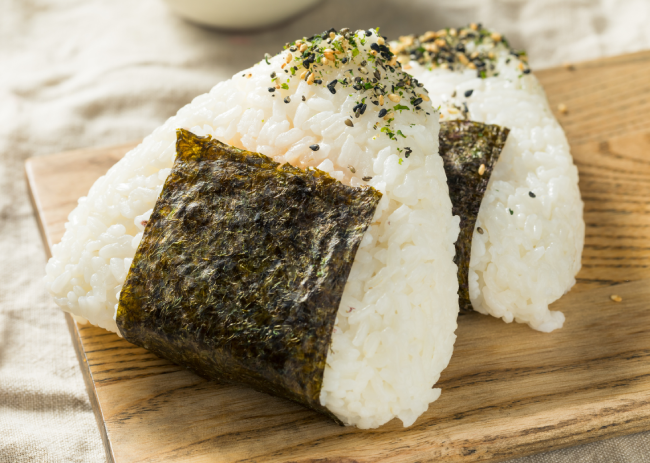
- Use the palms of one hand and the fingers of the other to gently mould the rice ball into a broad triangular shape. As you move, rotate the rice ball. However, try to avoid packing the rice too tightly; it should hold together well.
- Sprinkle black sesame seeds all over the onigiri's outside. After that, wrap each onigiri in a sheet of nori and top each with a further tiny spoonful of tuna filling.
- Finally, serve right away and take joy!
Notes
- Cook the rice properly: Rinse the Japanese short-grain rice thoroughly to remove extra starch. Next, cook it with the appropriate amount of cold water on a stovetop or in a rice cooker. Remember to add a pinch of kosher salt for enhanced flavour.
- Prepare the tuna filling: Combine the drained Solid albacore tuna from Portofino with extra virgin olive oil with mayonnaise, sriracha hot sauce, rice vinegar, and finely sliced scallions. After that, Mix the ingredients well to ensure they are evenly distributed and create a cohesive filling.
- Taste and adjust: Before assembling the onigiri, taste the tuna filling and make any necessary adjustments. Add more mayonnaise for creaminess, sriracha hot sauce for spiciness, or rice vinegar for acidity, based on your personal preference.
- Shape the onigiri: Wet your hands with water to prevent sticking, then take a small handful of cooked rice and flatten it in your palm. Place a spoonful of tuna filling in the center, then fold the rice around the filling, shaping it into a triangle or oval. Repeat the process until all the rice and filling are used.
- Add optional toppings: If desired, sprinkle toasted black sesame seeds over the onigiri for added texture and flavour. Moreover, This optional step provides a delightful nuttiness and visual appeal to the final dish.
- Wrap with nori: Take a half-sheet of toasted nori and wrap it around the shaped onigiri. The nori adds a slightly salty and umami taste, while also providing a convenient hand-held wrapper.
- Enjoy and store properly: Tuna Onigiri should enjoy fresh, but if you have leftovers, store them in an airtight container in the refrigerator. Consume within a day or two for optimal taste and texture.