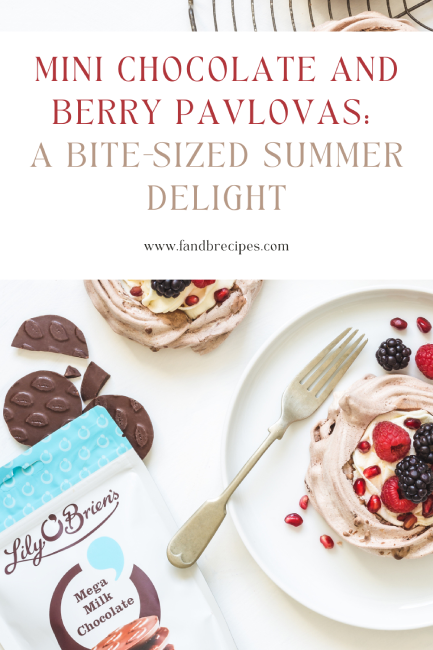
Mini Chocolate and Berry Pavlovas: A Bite-Sized Summer Delight
Step into a world of culinary bliss as we invite you to indulge in the irresistible flavours and refined charm of our Mini Chocolate and Berry Pavlovas.
Crispy on the outside, soft and chewy on the inside, and adorned with luxurious cream and vibrant summer berries, these mini pavlovas are a testament to the art of dessert-making and are sure to impress both your guests and your taste buds.
Join us as we walk you through the art of creating these mini chocolate and berry pavlovas, guiding you through each step to ensure your success in crafting this classic and universally loved dessert. Let’s dive in!
The History of the Pavlova
The pavlova, a beloved meringue-based dessert, traces its origins back to the early 20th century in either Australia or New Zealand. This delicate confection was named in homage to the renowned Russian ballerina, Anna Pavlova.
A circular base of baked meringue forms the foundation of the pavlova, boasting a crispy crust that gives way to a light and fluffy marshmallow interior. Typically adorned with whipped cream and an array of fresh fruits, this dessert has become a hallmark of both Australian and New Zealand cuisines.
The debate over its true birthplace has sparked a friendly rivalry between the two nations, adding to the intrigue surrounding its history. Simple in its preparation, the pavlova holds a special place on celebratory tables all over the world, especially during the summer and Christmas seasons, where it continues to delight palates with its irresistible flavour and charm.
Who Is This Recipe For?
This recipe is for all dessert enthusiasts and adventurous home bakers who seek to elevate their culinary repertoire. It’s perfect for those looking to impress their guests with a visually stunning and deliciously satisfying dessert.
With a harmonious blend of textures and flavours, the mini chocolate and berry pavlovas can be a rewarding task for both novice and experienced bakers alike. So, roll up your sleeves, unleash your inner patisserie artist, and let’s get stuck into this delightful creation.
You Will Need
To make the Mini Chocolate and Berry Pavlovas, you’ll need the following kitchen equipment:
- Stand mixer or electric hand mixer
- Baking trays
- Baking parchment
- Cup or glass for drawing circles
- Spatula
- Piping bag and tip (optional)
- Cooling rack
The Perfect Meringue Base
To create the foundation of our mini chocolate and berry pavlovas, we start with a luscious meringue. Here’s what you’ll need:
Ingredients:
- 6 large egg whites at room temperature
- 300g sugar
- 2 tsp cornstarch
- 1/2 tbsp lemon juice
- 1/2 tbsp vanilla extract
- 3 tbsp cocoa powder
- 50g Lily O’Brien’s Mega Milk Chocolate Share Bag (roughly chopped)
Method:
- Preheat your oven to 180°C/160°C Fan and line two baking trays with baking parchment. Draw 7-8 cm wide circles on the paper using the top of a cup or glass. Keep the circles spaced a few centimetres apart as the meringues will spread slightly during baking.
- In a stand mixer, beat the egg whites on high until satiny peaks form.
- Gradually add the sugar, one spoonful at a time, while continuing to beat on high speed until the meringue mixture is glossy and stands in stiff peaks.
- Using a spatula, quickly fold in the lemon juice and vanilla extract.
- Fold in the cornstarch and cocoa powder until just blended.
- Pipe the meringue mixture inside the circles on the parchment paper, starting in the middle of one of the drawn circles and piping outwards to fill the entire area.
- Create a little nest within each circle by piping another layer of meringue around the edge, staying inside the circle. Sprinkle the chopped chocolate inside each nest.
- Reduce the oven temperature to 130°C/110°C Fan and bake the pavlovas for 1 hour and 15 minutes. Afterwards, turn the oven off and let the meringues sit in the oven for an additional 30 minutes without opening the door.
- Carefully transfer the pavlovas with the parchment paper onto the kitchen counter or a cooling rack. Allow them to cool to room temperature.
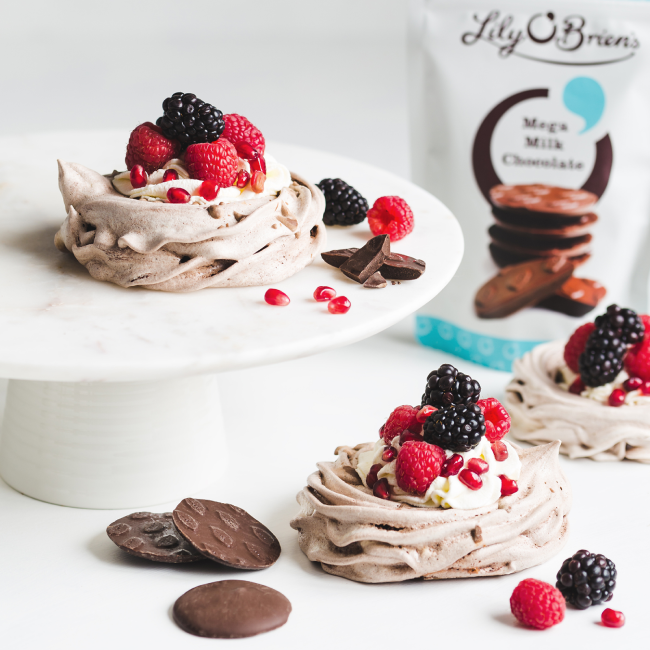
The Finishing Touch: Creamy Topping and Fresh Summer Berries
No pavlova is complete without a tantalising topping of whipped cream and fresh berries. Here’s what you’ll need for the finishing touches:
Topping Ingredients:
- Your favourite seasonal berries, e.g, raspberries, blackberries or pomegranate seeds
- 300ml whipping cream
Method:
- Once the mini chocolate and berry pavlovas have cooled to room temperature, it’s time to assemble and top them.
- Whip the whipping cream until it reaches a thick and creamy consistency.
- Spoon a dollop of whipped cream onto each pavlova, gently spreading it within the meringue nest.
- Scatter a generous amount of your chosen berries on top of the cream.
- Repeat the process for each pavlova, ensuring a colourful variety of berries on each one.
- Once assembled, your Mini Chocolate and Berry Pavlovas are ready to be enjoyed!
Storing Leftovers
If you have any leftovers (which is quite rare, considering how irresistible these pavlovas are), you can store them in an airtight container. Place them in a cool, dry place or in the refrigerator, and they will stay fresh for 3-5 days. Keep in mind that the longer they are stored, the softer the meringue will become so it is best to consume them as soon as possible for that perfect texture.
Recipe Tips and Variations
- For a touch of decadence, you can drizzle melted chocolate over the whipped cream and berries before serving. It adds an extra layer of indulgence to the pavlovas and who would say no to more chocolate?!
- If you prefer a different flavour combination, feel free to experiment with various fruits. Sliced strawberries, blueberries, or even tropical fruits like mango and kiwi work beautifully with the chocolate meringue and cream.
- To save time, you can prepare the meringue nests in advance and store them in an airtight container until you are ready to serve. This is especially convenient when hosting a dinner party or gathering. Simply top with cream and berries when it is time to serve and enjoy!
- For a gluten-free version, ensure that the cocoa powder and chocolate you use are certified gluten-free.
FAQ (Frequently Asked Questions)
Q: Can I use a different type of chocolate in the meringue?
A: Absolutely! While the recipe calls for Lily O’Brien’s Mega Milk Chocolate, you can substitute it with your favourite chocolate. Dark chocolate, white chocolate, or even flavoured chocolates can add an interesting twist to the pavlovas.
Q: Can I use frozen berries instead of fresh ones?
A: Yes, you can use frozen berries if fresh ones are not available. Thaw them before using and pat them dry to prevent excess moisture from making the pavlovas soggy.
Q: Can I make the meringue nests smaller or larger?
A: Certainly! Feel free to adjust the size of the meringue nests according to your preference. Just keep in mind that baking time may vary depending on the size.
In Conclusion
Whether you’re hosting a dinner party, celebrating a special occasion, or simply treating yourself, these pavlovas are sure to be a crowd-pleaser. So, grab your apron, gather the ingredients, and embark on this baking challenge that will leave you craving more.
If you’re eager to recreate this exquisite dessert or explore more mouthwatering recipes, visit Lily O’Briens Irish Chocolate. Discover a world of culinary inspiration and elevate your dessert game to new heights. It’s the perfect time to satisfy your sweet cravings and embark on a delicious baking adventure!